by Eric Petrus, Creator of Guitar Repair Business Starter
Tired of forking out $100 every time you need your guitar serviced?
I’ll show you how you can master the most common guitar repair service in a few short weeks. So you don’t need to rely on anyone else to maintain your guitar. And you never have to leave your precious gear with a stranger.
Before we dive in, here’s a secret that most luthiers don’t want you to know…
Setups are fast and easy (yes, really!)
Setups cure just about everything. 90% of the time a truss rod turn is all the guitar needs. A good technician can perform a complete setup in less than 30 minutes and will be happy to charge you $100 or more. And…there are only 5 essential tools. These tools are cheap, but precise, and you can get started for $28.00.
Here are five budget tools you can buy on Amazon:
- A capo: $10 Nothing fancy really.
- A .010 feeler gauge: $7 This is the one thing you have to get.
- The truss rod tool which fits your guitar: $6.50 You may already have it.
- The bridge adjustment tool which fits your guitar: $6.50 You may already have it.
- String Height Measuring Gauge: $8
Setups may seem scary and mysterious – but they’re not. You’re just taking measurements and making small adjustments. There is nothing here that could possibly harm your guitar.
Follow these simple steps to complete a guitar setup
- Set neck relief correctly. That’s where the feeler gauge, capo and truss rod tool come in.
- Dial in the string action. You do that by using your string action gauge to measure the height of the string. Then you use the bridge adjustment tool to raise and lower the bridge. Follow the recommended guidelines for string height and voila, the big part of the setup is done.
- General Maintenance: polish frets, oil the fretboard and clean your guitar. You can do that yourself too.
You can get your action dialed in about 15 minutes. Save yourself $100 and do it all year long. A $28 investment can launch a business as well. Start working and transition into your own $100 per 30-minute gig.
How you use your tools to set up your guitar
Tune the guitar and place a capo on the first fret. Place your finger on the last fret of the low E string. You’ve now created a straight line that goes from the first fret to your finger. You can measure the curvature of the neck as it relates to the straight line.
The way you measure neck relief is with a feeler gauge. It’s a thin and very precise tool for measuring gaps. Feeler gauges can measure gaps within a thousandth of an inch. The one you need is the .010 gauge. Unfortunately, you must buy a whole set to get the one you need. But they’re very cheap.
After you’ve got your straight line, you insert the feeler gauge. Let the feeler gauge ride on top of the 9th fret and underneath the Low E string. Ideal neck relief is one where the gauge fits perfectly inside the gap. You should be able to feel the grooves of the strings graze the top of the feeler gauge.
If you have no gap and the gauge won’t fit at all. That means you have no neck relief and the truss rod must be loosened until the gap is .010.
If you have too much gap and the feeler gauge doesn’t touch the string at all, you have to tighten the truss rod until the gap is a perfect .010.
It takes about 5 minutes and setting your neck relief correctly will drastically improve your playability.
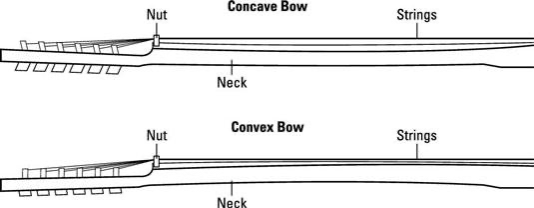
Ok, the whole point of neck relief is to give the neck a little bow. Just enough so the string has room to vibrate when fretted. Without neck relief, or room for the string to vibrate, you will have a lot of buzz. That’s from the string vibrating and touching the next fret in line. When your neck relief is good, you can adjust the bridge to get your ideal action.
👇You’re looking for concave bow.
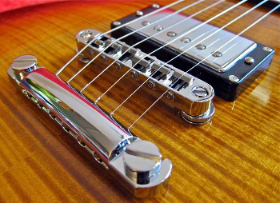
There are two main bridge types. Those with individual saddles, like a Stratocaster. Then there are those where the whole bridge moves up and down.
If you’ve got individual saddles, you need the little Allen wrench that fits the height adjustment screw. They are small and there is usually one on either side of the string. You can adjust each string to the height you want by moving those height adjustment screws.
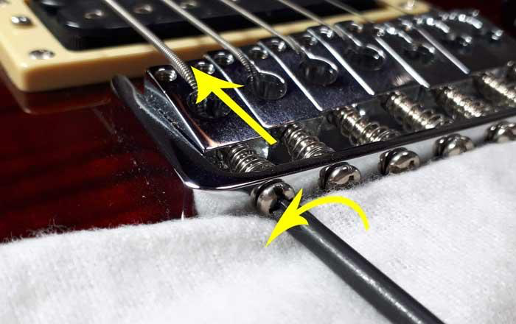
On a bridge that moves up and down like a Gibson Tune-O-Matic or Floyd Rose there are two posts on either side of the bridge. The posts can be adjusted which moves your string up and down.
What’s the recommended string height or action?
Get out your string height gauge and measure the string at the 17th fret for electric guitars. Measure at the 12th fret for acoustics and basses.
For electric guitars, what you want to see is 1.6mm on the low strings and 1.5mm on the high strings. That should get you just about, if not perfect. If you’ve done that, Congrats, your guitar is ready to play well.
For acoustic guitars, when using your string height gauge, you want to see around 2.5 mm measured at the 12th fret.
For bass guitars, I recommend measuring string height at the 12th fret. The measurements below make for an excellent feeling bass with low action..
E-2mm, A-1.75mm, D-1.6mm, G-1.6mm

Tune it up, play it and listen for buzzes. Are there any? Are there any that are so big, you need to raise the string a bit? Could you lower the string a hair? Maybe you could get away with lower action. Anyways, you’re in control now, you are right there near the sweet spot, so just dial the bridge up and down until you find it.
Congrats, you’re all done. The guitar should be playing great. If you want to go all out and do the general maintenance, keep reading.
General maintenance is polishing frets, cleaning the fretboard, cleaning the guitar and cleaning the electronics.
You basically need to buy 4 or 5 things which are cheap, high quality and will last forever.
Fretboard oil and guitar cleaners are easily found on Amazon. Buy a small bottle of oil unless you have a huge collection of guitars. A little goes a long way. With oil, you put one drop on each fret. Wipe it on and then wipe it off. If the fretboard really dry, do that twice. Normally oiling is only done once a year or so.
Dunlop 65 is a good all-purpose cleaner that doesn’t break the bank. Use an old T-shirt and get your axe looking new again.
Deoxit spray is what’s used to clean electronics. It’s about $16 a can but it’s the only thing that works. Point and spray into Potentiometers and switches. Turn your knobs back and forth to distribute the spray. If one spray doesn’t get rid of scratchiness, two sprays will.
Freshly polished frets are amazing when done right. You need a fretboard protector which is a little piece of metal you place over the fret. That protects the fretboard from any scratches.
Then you need micro-fiber polishing papers. Zona is the brand on Amazon. These polishing papers are measured in microns and they come in different colors according to grit. You can cut off small 1-inch pieces and rub them back and forth over the frets. You will see immediate results. By the time you’re finished going through all the grits, you will be able to see your reflection in the frets.
What about intonation?
Most often, intonation is done already but sometimes it’s not. You check intonation by letting the note ring in the open position and then fretted at the 12th fret. The note should differ by one octave but should remain in tune. So, when you fret the string at the 12th fret, it shouldn’t be going sharp or flat.
If it is going sharp or flat, you must make small adjustments to the intonation screws👇.
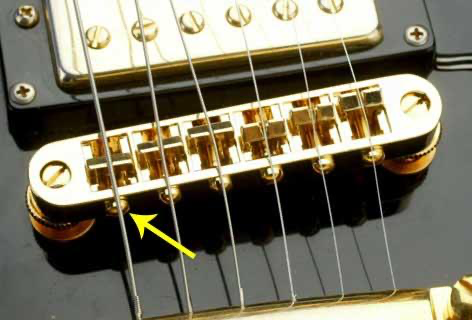
If the notes pulls sharp at the 12th fret, you must tighten the intonation adjustment screw to lengthen the string.
If the note pulls flat at the 12th, you must loosen the intonation adjustment screw. That will decrease the length of the string.
When making adjustments, make small adjustments and check often.
All right, that should save you some money. Tune in for next time and I’ll show you how to solder your own electronics, swap out your pickups, and upgrade your nut. All for less than $60.
Curious how much money you can make repairing guitars from home?
Sign up for my Free Workshop: How To Make $70-$120 Hour As A Guitar Technician: https://www.guitarrepairbusinessinformation.com/grbs-flagship-course-funnel4iazonqu
You’ll discover the three essential steps to building your guitar repair business. With real-life examples of how much you can earn. And examples of the beginner-friendly services you can offer.
Eric Petrus the founder of NoVA Guitar Setups and creator of Guitar Repair Business Starter. He helps other guitar enthusiasts master guitar setups and other in-demand repair services. So they can get their guitars playing exactly how they want them. And make good money doing what they love.